Placements and the first 7 days of broiler management
The brooding period is considered the period from placement through 14 days, and it is the most important time in a bird’s life as it has the biggest impact on the future performance of the flock. It is during this time that the greatest percentage of the nutrients consumed go to the growth of the birds to give the most rapid growth rate. Therefore a ‘good start’ is extremely important. The survival of the newly hatched chick is dependent on how quickly and efficiently they can adapt to the brooding environment. Careful control of the brooding conditions will give the chick the good start that they need. Any mistakes made during this time may be very difficult to correct and they may negatively affect the performance of the flock over the entire growing period.

The aim must be to minimize mortality and maximize flock uniformity and the overall performance of the flock to achieve the lowest chick cost. The body weight at 7 days is an excellent indicator of how successful the brooding management has been.
This weight can be used as a ‘tool’ to illustrate the difference between well-managed and poorly managed farms. As a rule of thumb, the body weight at 7 days should be approximately 4 times the day-old chick weight. If the chicks are not achieving these weights, then the pre-placement and brooding management techniques should be re-evaluated.
The effect of stress early in the chicks’ lives may only be seen much later, and the performance of the flock may be negatively affected. One of the main reasons for poor weight gain is low feed intake. During the first week, a good quality, finer crumble is required to get a good feed intake. Not enough feeders or insufficient feeder space will negatively affect feed intake, lower weight gain and result in poorer flock uniformity.
By focusing on the key points and doing these correctly will ensure that the best possible performance of the flock is achieved.
House preparation:
Correct house preparation is a critical step. The correct cleaning and disinfection procedures must be followed before starting to prepare the house, and this must be done well before the chicks are due to arrive to give sufficient time for the house to dry and warm up. All required equipment must be in the house before the chicks arrive.
The entire floor should be covered with 5-10 cm of good-quality litter material to prevent heat loss. Litter should be spread evenly throughout the house to ensure an even floor temperature. Uneven floor temperatures can cause chicks to huddle in groups. Uneven litter will affect the ability of the chicks to move around as well as their ability to get to the feed and water due to the uneven height of feed and water lines.
Water lines must be cleaned, sanitised, and thoroughly flushed before flock placement. The water line pressure must be adjusted to be suitable for the day-old chick.
Automated and supplementary feeders and drinkers must be in place and must be filled with fresh feed and water before chick placement.
The heaters and brooders must be turned on well before the chicks arrive. It is recommended that in winter, it should be 48 – 72 hours and in summer, 24 – 48 hours before. The target is to have a litter and house temperature of 32°C and a minimum floor and wall temperature of 28°C. If the temperature is lower than this, then the chicks will lose heat through their legs, and this will cause them to lie down. They will then lose more heat from all the points where their body is touching the ground. Their body temperature will go down, and they will quickly become chilled.
When the chick is chilled, it will not eat or drink, and this affects the absorption of the yolk sac. Poor absorption of the yolk sac means that the maternal antibodies are not effectively transferred to the chick. An infection, mainly due to E. coli, can develop at the site of the yolk sac, which can lead to increased mortality. Those chicks that do not die will be smaller, and their growth will be compromised for the rest of the growing period.
Arrival of the chicks:
All the people who will be placing the chicks must shower and put on clean clothes and clean,
disinfected boots to reduce the risk of transmitting any diseases to the young chicks.
The chick boxes must be taken from the delivery vehicle and placed in the house as quickly as possible. Once all the boxes are in the house, close the house again to maintain the temperature. The chicks must be taken out of the boxes quietly and gently and placed close to the feed and water lines. Leave them to settle alone to settle for 1 – 2 hours.
The focus during the next 24 hours is to get all the chicks to eat and drink as much as possible.
After allowing the chicks to settle, check that the feed, water, temperature, and relative humidity are correct. Relative humidity should be between 65 – 75% for the first 3 days. Make any adjustments if required.
Light intensity should be at least 25 lux in the darkest area of the house, and it should be no more than 30 lux in the brightest area of the house. It is important to make sure that the distribution of the lights is as even as possible.
When the chicks are comfortable, they will be evenly distributed throughout the brooding area and will be actively moving. Randomly select several chicks and place their feet against your cheek or neck. It is easy to feel if they are warm or cold. If they are cold, then re-evaluate the pre-heating procedures.
Water management:
It is important to provide easy access to clean, fresh water to encourage feed intake and maintain growth. The chicks must have access to the main drinking system, and it is recommended the chicks are comfortable, they will be evenly distributed throughout the brooding area and will be actively moving. Randomly select several chicks and place their feet against your cheek or neck. It is easy to feel if they are warm or cold. If they are cold, then they re-evaluate the pre-heating procedures.
At placement, a drop of water should be visible on the end of the nipple to encourage water consumption; this is achieved by setting the pressure low in the drinking system. Once you are sure that the water consumption has been achieved in the flock, turn the pressure settings in the drinking system up to prevent spillage and wet litter.
The height of the nipple line should be at eye level for the first 48 - 72 hours after placement. Begin raising nipple lines on the 4th day so birds are drinking at a 45° angle.
Litter conditions are a good indicator of the effectiveness of water system settings. Damp litter under the water source indicates drinkers are set too low or the pressure is too high. Very dry litter under drinkers may indicate that the water pressure is too low or the nipple line is too high for birds to reach.
It is important to keep a record of the water intake as a drop in water consumption is often the first indicator of a problem. Chicks will consume nearly 3 times the volume of water as compared to feed during this period.
Feed management:
To make sure that feed is easy to find for the chick, supplementary feed should be made available in either flat trays or on sheets of paper. The paper can be placed under or between the feeding systems, and approximately 40g per bird should be measured out and fed on the paper before chick placement.
To stimulate feed intake, additional feed can be put onto the paper at regular intervals during the first 3 to 4 days. The movement of the staff and the placement of the feed will encourage the chicks to move around to eat and drink.
To check that the chicks have been able to find feed and water, the following crop checks should be done.
- After 8 hours, randomly select 100 chicks and check their crops. A minimum of 85% of them should have feed and water in the crop.
- The morning after placement, 95% of the chicks should have feed and water in the crop.
The check is done by gently feeling the crop, and it should feel soft and pliable, indicating that they have successfully found feed and water. If the crop feels hard, then this indicates that they have found feed but not water. Water availability must be checked immediately. A swollen and distended crop indicates that the chicks have found water, but feed intake has not been sufficient. The feed availability and consistency should be checked immediately.
When doing these checks, it is recommended that a record be kept of the number of birds that fall into each category.
| Crop fill | No. of Chicks |
Full & Pliable Feed & Water |
Full & Hard Feed Only |
Full & Soft Water Only |
Empty |
| Evaluation |
To make it as easy as possible for the chicks to access the feed, the pans of the automatic feeding system should be placed directly on the concrete or into litter.
Set the feeding system to the maximum so that the pans fill up, and this will give the birds easy access to the feed without having to climb into the feeder.
As the birds grow, the feeders must be raised regularly so that the lip of the pan is always level with the back of the birds.
A starter feed should be fed during this period in the form of a fine crumble.
Temperature management:
Before the chicks are placed, the brooders and heaters should be checked regularly to make sure they are working correctly. The pre-heating of the house should begin at least 24 – 48 hours before the chicks are due to be placed to ensure that the floor, litter, and air temperatures are ideal when the chick is placed.
The target air temperature should be adjusted depending on the relative humidity that can be achieved in the house. The table can be used as a guide to determine the target temperature.
This will make sure that the effective temperature experienced by the bird is correct. Regularly check the behaviour of the chicks and adjust the temperature setting based on what you observe.
|
|
Humidity |
||
|
Age (days) |
30% |
40% |
50% |
|
0 |
34°C |
33°C |
32°C |
|
7 |
32°C |
31°C |
30°C |
|
14 |
29°C |
28°C |
27°C |
The diagrams below indicate the behaviour of the birds under different environmental conditions.

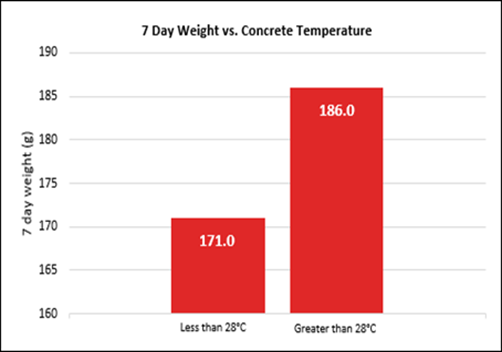
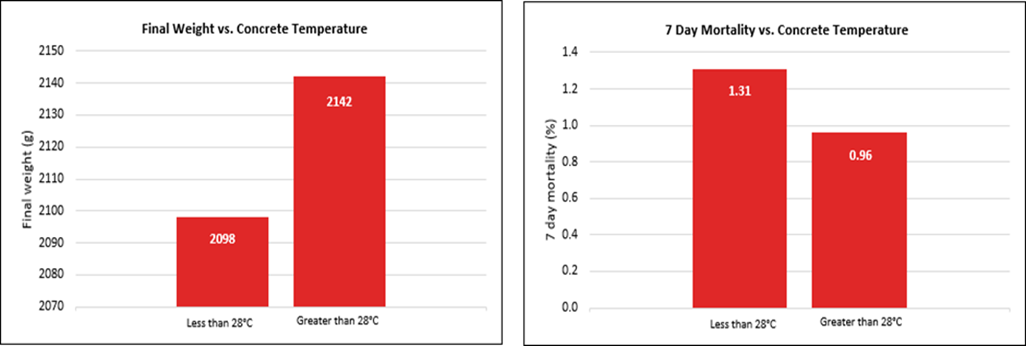
Managing the concrete floor temperature during the first two weeks is very important. If the temperature is too cold, they will lose heat through their feet and become chilled.
Data from Cobb is presented in the following graphs, which clearly show the effect of concrete temperature on the performance of the chicks. A minimum concrete temperature of 28°C has a big impact on early performance, especially mortality, weight gain and flock uniformity.
Air quality and ventilation:
When managing temperature in the house, air quality and ventilation must also be considered. Proper ventilation will distribute the heat evenly throughout the house and will maintain optimum air quality in the brooding area.
Minimum ventilation should be started when the pre-heating of the house starts to remove waste gases and moisture. Young chicks are very susceptible to drafts, and the ventilation system must be managed very carefully when the birds are young to prevent them from becoming chilled.
The table ‘Definition of good air quality’ from Cobb gives the standards that should be used to manage the ventilation system. Minimum ventilation brings fresh air into the house while maintaining the required temperature in the house. Minimum ventilation must be increased if CO2 000 ppm or oxygen levels drop below 19.6%.
|
Definition of Good Air Quality |
|
|
Oxygen |
> 19.6 % |
|
Carbon dioxide |
< 0.3% or 3000 ppm |
|
Carbon Monoxide |
< 10 ppm |
|
Ammonia |
< 10 ppm |
|
Inspirable dust |
< 3.4 mg/m3 |
|
Relative Humidity |
> < 45 - 65 % |
During the first 14 days, there should be no drafts, either warm or cold, at bird level. A draft is defined as any air movement that is greater than 0.3 m/second at floor level.
It is good practice to observe all the birds across the whole house to see how they are behaving before making any changes to the ventilation system. Conditions may vary across the house, and the reasons for these should be identified before making any adjustments.
Lighting management:
The hours of light and dark and the distribution of the light periods during the day can affect broiler productivity and health. The best lighting programmes are simple and easy to implement.
The best lighting programme for an individual flock will depend on their circumstance and the market requirements. For any lighting programme to be successful, the light in the house must be evenly distributed. It is recommended that light should be provided for 24 hours on the day of placement to ensure good feed and water intake. This will also encourage chick activity in the brooding area. The light intensity should be between 20 – 70 lux up to seven days of age.
Continuous lighting after the first 24 hours is not recommended. Periods of darkness increase feed efficiency and health, reduce mortality, and it is necessary for normal behaviour. The following lighting programme is recommended to benefit bird health and biological performance.
- For the first 24 hours, they should receive continuous light with no dark period.
- From 1 to 7 days of age, there should be 23 hours of light and 1 hour of darkness.
- After 7 days through to the end of the growing period, 4 – 6 hours of darkness will be beneficial
Conclusion:
The first 14 days of a broiler chick’s life is a critical time that contributes to the overall flock performance. At placement, the day-old chick is entirely dependent on you for its survival. Your objective is to create ideal environmental conditions where the chick is completely comfortable. Good management and careful attention to detail are required to achieve the objective of giving the chick a “good start”.
For more info on references for the article or any questions, please contact your nearest technical advisor.